Tailwind 配置
Tailwind 是一个支持定制化的 UI 框架,可以将它进行配置「改造」,以适用于开发更具个性化的用户交互界面。一般在项目的根目录下的 tailwind.config.js 文档对 Tailwind 进行配置操作
// 一个配置文件示例
module.exports = {
  content: ['./src/**/*.{html,js}'],
  theme: {
    colors: {
      'blue': '#1fb6ff',
      'purple': '#7e5bef',
      'pink': '#ff49db',
      'orange': '#ff7849',
      'green': '#13ce66',
      'yellow': '#ffc82c',
      'gray-dark': '#273444',
      'gray': '#8492a6',
      'gray-light': '#d3dce6',
    },
    fontFamily: {
      sans: ['Graphik', 'sans-serif'],
      serif: ['Merriweather', 'serif'],
    },
    extend: {
      spacing: {
        '8xl': '96rem',
        '9xl': '128rem',
      },
      borderRadius: {
        '4xl': '2rem',
      }
    }
  },
}
Tip
以上的每一个配置项都是可选的,如果某个选项为空,则该选项就会(回退 fallback)采用默认配置
生成配置文件
可以在终端输入命令来生成 Tailwind 的配置文档 tailwind.config.js,不同的命令生成不同的预设内容的配置文档:
npx tailwindcss init
然后就会在项目的根目录下生成一个 tailwind.config.js 文档,它十分简单,各选项都没有配置值(使用空对象或空数组)
module.exports = {
  content: [],
  theme: {
    extend: {},
  },
  plugins: [],
}
Tip
如果希望生成一个具有所有默认参数的 tailwind.config.js 文档(相当于 eject 所有默认设置,便于基于默认值进行修改,这也是 Tailwind 在内部调用的默认配置。),可以在命令中添加 --full 参数
npx tailwindcss init --full
Tip
如果将 Tailwind 作为 PostCSS 的一个插件,需要在根目录生成 PostCSS 配置文档,则可以在初始化命令中添加 -p 参数
npx tailwindcss init -p
这会在根目录中同时生成 Tailwind 的配置文档 tailwind.config.js 和 PostCSS 的配置文档 postcss.config.js
而且在 PostCSS 配置文档中,已经预设将 tailwindcss 和 autoprefixer 作为 PostCSS 插件
module.exports = {
  plugins: {
    tailwindcss: {},
    autoprefixer: {},
  },
}
Tip
如果希望使用其他文件名作为 Tailwind 的配置文件,可以在初始化命令中添加 -c 参数
# 生成名为 tailwindcss-config.js 的文档作为配置文档
npx tailwindcss init tailwindcss-config.js
如果使用 Tailwind CLI 编译,同样记得在需要使用参数 -c 显式地指明所使用配置文件
npx tailwindcss -c ./tailwindcss-config.js -i input.css -o output.css
如果将 Tailwind 作为 PostCSS 的一个插件,同样记得需要在配置文档 postcss.config.js 中进行相应的设置
module.exports = {
  plugins: {
    tailwindcss: { config: './tailwindcss-config.js' },
  },
}
配置选项
content
content 选项的值是一个数组,用于指定编译器需要扫描/监听的 HTML 模板文件、JS 组件文件等使用了 Tailwind 基础类的文档。
Tip
其中支持使用正则表达式来匹配多个文件,例如 * 匹配任意值(除了转义符 / 以及隐藏文件),** 匹配任意多个目录(也包括零个目录),使用 {jpg, png} 形式来匹配多个值,如文件的类型/拓展名。在 Tailwind 内部使用 fast-glob 库来匹配文件。
module.exports = {
  content: [
    './pages/**/*.{html,js}',
    './components/**/*.{html,js}',
    './index.html',
  ],
  // ...
}
Tip
应该尽可能地提供详细的信息,避免由于使用大量通配符而导致 Tailwind 扫描 node_modules 里的文件。
有的框架会将项目的 HTML 入口文件放在 public 目录下,如果在该 HTML 文件中使用了 Tailwind 的基础类,记得将其也包含在 content 选项中。
module.exports = {
  content: [
    './public/index.html',
    './src/**/*.{html,js}',
  ],
  // ...
}
如果在 JS 文档中对 HTML 元素操作添加了 Tailwind 的基础类,该文档也应该包含在 content 选项中。
// ...
menuButton.addEventListener('click', function () {
  let classList = document.getElementById('nav').classList
  classList.toggle('hidden')
  classList.toggle('block')
})
// ...
module.exports = {
  content: [
    // ...
    './src/**/*.js',
  ],
  // ...
}
Warning
Tailwind 扫描 content 特定所包含的文件,不仅仅会在 class="..." 字符串中进行搜索,而是进行全局文本的搜索我们使用了哪些基础类,因为我们可能会使用 JS 来操作 HTML 元素的类名。基于其扫描的工作流程,在使用基础类时有一点值得注意,即不可通过拼接的方式构成基础类,否则 Tailwind 无法在编译时识别抽取它们
<!-- 无法在编译生成样式表中含有 text-red-600 和 text-green-600 基础类所对应的样式 -->
<div class="text-{{ error ? 'red' : 'green' }}-600"></div>
<!-- 应该使用完整而非拼接的方式构成的基础类 -->
<div class="{{ error ? 'text-red-600' : 'text-green-600' }}"></div>
Tip
如果希望自定义 Tailwind 的扫描抽取所用基础类的规则,可以通过 content.extract 属性进行设置,content 选项是一个对象,其中 files 属性是一个数组,包含需要扫描的原文件;extract 属性是一个对象,其中指定了哪些类型的文件(其拓展名作为属性名)需要使用自定义的抽取规则,属性值为抽取的方法,其中入参是原文件的内容 content。
但是一般情况下 Tailwind 的默认抽取规则就足以应对大部分项目。
module.exports = {
  content: {
    files: ['./src/**/*.{html,wtf}'],
    extract: {
      wtf: (content) => {
        return content.match(/[^<>"'`\s]*/)
      }
    }
  },
  // ...
}
Tip
如果 content 数组中所包含的元素并不是需要扫描/监听的文件(路径),而是原始内容(如一段 HTML 代码),则需要以对象的形式来指明
module.exports = {
  content: [
    './pages/**/*.{html,js}'
    './components/**/*.{html,js}',
    { raw: '<div class="font-bold">', extension: 'html' },
  ],
  // ...
}
Tip
有时候我们需要扫描的原文件并非为 HTML 类型,如 Markdown 文档,可以先将它们转换为 HTML 格式,再让 Tailwind 扫描所使用的基础类更合适。
此时 content 选项是一个对象,其中 files 属性是一个数组,包含需要扫描的原文件;transform 属性是一个对象,其中指定了哪些类型的文件(其拓展名作为属性名)需要进行转换,属性值为转换的方法,其中入参是原文件的内容 content
const remark = require('remark')

module.exports = {
  content: {
    files: ['./src/**/*.{html,md}'],
    transform: {
      md: (content) => {
        return remark().process(content)
      }
    }
  },
  // ...
}
safelist
safelist 选项可以看作是 content 选项的替代,它设置了一系列「安全」的基础类,这样 Tailwind 在编译时不管项目中是否有使用这些基础类,它们所对应的样式都会被编译到样式表中。
module.exports = {
  content: [
    './pages/**/*.{html,js}'
    './components/**/*.{html,js}',
  ],
  safelist: [
    'bg-red-500',
    'text-3xl',
    'lg:text-4xl',
  ]
  // ...
}
Warning
一般不推荐使用该选项,仅在无法通过扫描文件获取所使用的基础类时,例如一个 UGC 网站,其大部分内容需要由使用者来生成,开发者预先无法得知用户会使用哪些基础类(所对应的样式)。因为该方法可能产生无用的样式代码,使得网页文件变大。而 content 选项则不同,Tailwind 会扫描这些文件,提取出其中所使用过的基础类,再按需编译出样式表,可以保持网页的样式表文件大小最小化。
Tip
safelist 选项的元素支持使用正则表达式,以含有属性 pattern 的对象,来指定需要匹配的基础类的模式。如果希望匹配使用了特定状态变量,如 hover: 的任意基础类,则使用含有 variant 的对象来指定。
module.exports = {
  content: [
    './pages/**/*.{html,js}',
    './components/**/*.{html,js}',
  ],
  safelist: [
    'text-2xl',
    'text-3xl',
    {
      pattern: /bg-(red|green|blue)-(100|200|300)/,
      variants: ['lg', 'hover', 'focus', 'lg:hover'],
    },
  ],
  // ...
}
theme
theme 选项用以定义颜色 colors、字体 fontFamily、间隔尺度 spacing、边框圆角大小 borderRadius、断点 screens 等与视觉相关的基础类。
可以通过覆盖原有值和扩展添加新值的两种方式来自定义基础类
Tip
在 theme 选项中所有可选/可配置的属性可以查看官方的参考列表,它们即可以直接在 theme 选项下作为一级属性,覆盖原有的基础类;也可以在 theme.extend 下作为二级属性进行基础类的扩展
module.exports = {
  // ...
  theme: {
    // 直接在 theme 属性中设置的基础类会完全覆盖原有的 colors 的预设基础类
    colors: {
      'blue': '#1fb6ff',
      'purple': '#7e5bef',
      'pink': '#ff49db',
      'orange': '#ff7849',
      'green': '#13ce66',
      'yellow': '#ffc82c',
      'gray-dark': '#273444',
      'gray': '#8492a6',
      'gray-light': '#d3dce6',
    },
    fontFamily: {
      sans: ['Graphik', 'sans-serif'],
      serif: ['Merriweather', 'serif'],
    },
    extend: {
      // 在 theme 属性的 extend 属性下添加的基础类会以扩展添加新值的方式来添加自定义基础类(仍保留默认的 spacing 和 borderRadius 基础类)
      spacing: {
        '8xl': '96rem',
        '9xl': '128rem',
      },
      borderRadius: {
        '4xl': '2rem',
      }
    }
  }
}
Tip
如果在定制 theme 选项中的某个属性时,希望访问当前 theme 选项的其他属性的基础类,可以使用函数的方式(最后返回表示基础类的对象)。
该函数的入参是一个对象,其中包含一个 theme 函数,可以调用它从而获取主题特性下的其他属性的值
module.exports = {
  theme: {
    spacing: {
      // 可以获取这里定制的基础类
      // ...
    },
    // 以函数的方式定义 backgroundSize 核心插件的基础类
    // 函数的入参对象可以解构出一个 theme() 方法
    backgroundSize: ({ theme }) => ({
      // background-size 样式值有多种形式
      // 可以是长度尺寸、百分比、`cover`/`contain`/`auto` 之一
      auto: 'auto',
      cover: 'cover',
      contain: 'contain',
      ...theme('spacing') // 通过调用 theme('spacing') 方法可以获取其他主题选项的属性的属性值
    })
  }
}
但是该函数只能用于 theme 选项下的一级属性,而不能直接用于设置次级属性(一般通过核心插件定制的基础类),如果需要在次级属性中使用该函数,在一级属性就需要以函数的形式表示
module.exports = {
  theme: {
    fill: ({ theme }) => ({
      gray: theme('colors.gray')
    })
  }
}
Tip
如果希望获取默认基础类的值,可以通过导入 tailwindcss/defaultTheme 来获取
const defaultTheme = require('tailwindcss/defaultTheme')

module.exports = {
  theme: {
    extend: {
      fontFamily: {
        sans: [
          'Lato',
          ...defaultTheme.fontFamily.sans,
        ]
      }
    }
  }
}
screen
screen 属性用以定制断点,与响应式布局相关的基础类,Tailwind 默认预设五个断点。这些断点会作为状态变量用于其他基础类前,如 md:text-center,以设置当页面的宽度大于特定值时才起作用的样式。
module.exports = {
  theme: {
    screens: {
      'sm': '640px',
      'md': '768px',
      'lg': '1024px',
      'xl': '1280px',
      '2xl': '1536px',
    }
  }
}
Tip
直接在 theme 特性下设置 screens 属性会覆盖默认值,而在 theme.extend 则可以保留原有的断点,扩展添加新的断点。⚠️ 但是该方法只能用于添加更大的断点,因为断点列表需要从小到大排列,以便符合最小值 min-width 断点系统匹配原理。
module.exports = {
  theme: {
    extend: {
      screens: {
        '3xl': '1600px',
      },
    },
  },
  variants: {},
  plugins: [],
}
如果希望添加更小断点,可以先导入 tailwindcss/defaultTheme 模块读取默认断点,再在它们前面添加更小的断点,构成新的断点基础类覆盖原有的值
const defaultTheme = require('tailwindcss/defaultTheme')

module.exports = {
  theme: {
    screens: {
      'xs': '475px',
      ...defaultTheme.screens,
    },
  },
  variants: {},
  plugins: [],
}
Tip
默认情况下,基于移动优先的原则,断点设定的是 min-width 值,也可以通过对象的形式,来显式地指定断点设定的是 min-width 还是 max-width。如果采用 max 形式,请确保断点列表是降序排列(需要从大到小排列)
module.exports = {
  theme: {
    screens: {
      // 将断点设定为 max-width(允许页面的最大值)
      // 即页面宽度小于特定值时,样式才起作用
      '2xl': {'max': '1535px'},
      // => @media (max-width: 1535px) { ... }

      'xl': {'max': '1279px'},
      // => @media (max-width: 1279px) { ... }

      'lg': {'max': '1023px'},
      // => @media (max-width: 1023px) { ... }

      'md': {'max': '767px'},
      // => @media (max-width: 767px) { ... }

      'sm': {'max': '639px'},
      // => @media (max-width: 639px) { ... }
    }
  }
}
Tip
也可以将断点设定为一个范围,即同时指定 min-width 和 max-width 的值,只有在页面的宽度正好落在该范围内,相应的样式才会起作用。
module.exports = {
  theme: {
    screens: {
      'sm': {'min': '640px', 'max': '767px'},
      // => @media (min-width: 640px and max-width: 767px) { ... }

      'md': {'min': '768px', 'max': '1023px'},
      // => @media (min-width: 768px and max-width: 1023px) { ... }

      'lg': {'min': '1024px', 'max': '1279px'},
      // => @media (min-width: 1024px and max-width: 1279px) { ... }

      'xl': {'min': '1280px', 'max': '1535px'},
      // => @media (min-width: 1280px and max-width: 1535px) { ... }

      '2xl': {'min': '1536px'},
      // => @media (min-width: 1536px) { ... }
    },
  }
}
更进一步,可以将一个断点状态变量对应于多个范围
module.exports = {
  theme: {
    screens: {
      'sm': '500px',
      // 该断点状态变量,对应两个宽度范围
      'md': [
        // Sidebar appears at 768px, so revert to `sm:` styles between 768px
        // and 868px, after which the main content area is wide enough again to
        // apply the `md:` styles.
        {'min': '668px', 'max': '767px'},
        {'min': '868px'}
      ],
      'lg': '1100px',
      'xl': '1400px',
    }
  }
}
Tip
如果希望断点基于其他样式属性,如高度 min-height,可以通过 raw key 来指定
module.exports = {
  theme: {
    extend: {
      screens: {
        'tall': { 'raw': '(min-height: 800px)' },
        // => @media (min-height: 800px) { ... }
      }
    }
  }
}
colors
colors 属性用以定制与颜色相关的基础类。这些颜色基础类都会被颜色相关的核心插件 ,如 backgroundColor、borderColor、textColor 等,所继承(以连字符 - 组合使用)
Tip
完整的色卡表可以查看官方文档
module.exports = {
  theme: {
    colors: {
      transparent: 'transparent',
      black: '#000',
      white: '#fff',
      gray: {
        100: '#f7fafc',
        // ...
        900: '#1a202c',
      },

      // ...
    }
  }
}
Tip
如果希望完全定制自己品牌的颜色基础类,可以在 theme.colors 属性下进行设置,这会覆盖默认的基础类。其中别忘了添加 transparent 和 currentColor 这两个基础类,便于设置颜色为透明值或从父元素处继承颜色。
module.exports = {
  theme: {
    colors: {
      transparent: 'transparent',
      current: 'currentColor',
      'white': '#ffffff',
      'purple': '#3f3cbb',
      'midnight': '#121063',
      'metal': '#565584',
      'tahiti': '#3ab7bf',
      'silver': '#evebff',
      'bubble-gum': '#ff77e9',
      'bermuda': '#78dcca',
    },
  },
}
::TipBox{type="tip"}::TipBox{type="tip"}如果希望使用默认的颜色值,可以通过导入 tailwindcss/colors 模块来使用,例如从默认的颜色中挑出几个作为项目的品牌色;也可以为默认颜色设置别名,便于记忆和使用
::
const colors = require('tailwindcss/colors')

module.exports = {
  theme: {
    colors: {
      transparent: 'transparent',
      current: 'currentColor',
      black: colors.black,
      white: colors.white,
      gray: colors.slate,
      green: colors.emerald,
      purple: colors.violet,
      yellow: colors.amber,
      pink: colors.fuchsia,
    },
  },
}
Tip
module.exports = {
  theme: {
    colors: {
      transparent: 'transparent',
      current: 'currentColor',
      'white': '#ffffff',
      'tahiti': {
        100: '#cffafe',
        200: '#a5f3fc',
        300: '#67e8f9',
        400: '#22d3ee',
        500: '#06b6d4',
        600: '#0891b2',
        700: '#0e7490',
        800: '#155e75',
        900: '#164e63',
      },
      // ...
    },
  },
}
Tip
如果希望基于默认的颜色,扩展添加几个新的颜色,可以在 theme.extend.colors 属性中进行设置。也可以为已有的颜色类别,添加其他深度的梯度
module.exports = {
  theme: {
    extend: {
      colors: {
        // 为蓝色添加新的深度梯度
        blue: {
          950: '#17275c',
        },
        // 添加新的颜色 brown 并设置一系列深度梯度
        brown: {
          50: '#fdf8f6',
          100: '#f2e8e5',
          200: '#eaddd7',
          300: '#e0cec7',
          400: '#d2bab0',
          500: '#bfa094',
          600: '#a18072',
          700: '#977669',
          800: '#846358',
          900: '#43302b',
        },
      }
    },
  },
}
Tip
如果希望在 HTML 页面使用一次自定义的任意颜色,可以通过 [color] 的方式来实现
<button class="bg-[#1da1f2] text-white ...">
  <svg><!-- ... --></svg>
  Share on Twitter
</button>
spacing
spacing 属性用以定制间隔和尺寸相关的基础类。这些基础类都会被 padding、margin、width、height、maxHeight、flex-basis、gap、inset、space、translate、scrollMargin、scrollPadding 和 textIndent 核心插件 继承(以连字符 - 组合使用)
module.exports = {
  theme: {
    spacing: {
      px: '1px',
      0: '0',
      0.5: '0.125rem',
      1: '0.25rem',
      1.5: '0.375rem',
      2: '0.5rem',
      2.5: '0.625rem',
      3: '0.75rem',
      3.5: '0.875rem',
      4: '1rem',
      5: '1.25rem',
      // ...
      96: '24rem',
    },
  }
}
Tip
完整的默认间隔表可以查看官方文档
Tip
如果希望完全定制间隔基础类(覆盖所有默认的基础类),可以在 theme.spacing 属性下进行设置
module.exports = {
  theme: {
    spacing: {
      sm: '8px',
      md: '12px',
      lg: '16px',
      xl: '24px',
    }
  }
}
Tip
如果希望基于默认值,扩展添加几个新的间隔,可以在 theme.extend.spacing 属性下进行设置
module.exports = {
  theme: {
    extend: {
      spacing: {
        '13': '3.25rem',
        '15': '3.75rem',
        '128': '32rem',
        '144': '36rem',
      }
    }
  }
}
core plugins
除了以上的 screens、colors 和 spacing 属性,其他的属性就是用于配置各个核心插件的基础类。
其中子属性名是作为后缀 suffix 使用,而其属性值就是相应的样式,一般有一个名为 DEFAULT 的属性,它是基础类不带有后缀时,其默认的样式。
例如 borderRadius 属性就是相对于核心插件 borderRadius,它用以配置圆角 border radius 基础类。
module.exports = {
  theme: {
    borderRadius: {
      'none': '0',
      'sm': '.125rem',
      DEFAULT: '.25rem',
      'lg': '.5rem',
      'full': '9999px',
    },
  }
}
/* 编译得到的相应样式 */
.rounded-none { border-radius: 0 }
.rounded-sm   { border-radius: .125rem }
.rounded      { border-radius: .25rem }
.rounded-lg   { border-radius: .5rem }
.rounded-full { border-radius: 9999px }
Tip
完整的核心插件列表
Tip
如果希望禁止对某些核心插件的基础类进行编译,可以在 corePlugins 选项中将其核心插件设置为 false(而不是在 theme 选项中为核心插件相应的属性赋予空对象,由于有的核心插件并没有在 theme 选项中暴露相应的属性,例如核心插件 float,在 theme 选项中没有相应的属性可进行配置,它们只能在 corePlugins 选项中进行设置)
// 禁止编译生成 opacity 基础类相应的样式
module.exports = {
  // 不推荐的方式
  theme: {
    opacity: {},
  }
  // ...
  // 推荐的方式
  corePlugins: {
     opacity: false,
  }
}
plugins
plugins 选项让我们可以通过创建插件的方式,以 JS 而非 CSS 方式来新增基础类、状态变量等。
需要先从 tailwindcss/plugin 模块导入 plugin 方法,用它来创建一个插件。
const plugin = require('tailwindcss/plugin')

module.exports = {
  plugins: [
    plugin(function({ addUtilities, addComponents, e, prefix, config }) {
      // Add your custom styles here
    }),
  ]
}
plugin 方法接收一个匿名函数 plugin function 作为入参,而该函数的入参是一个对象,可以从该对象解构出一系列实用的钩子函数 helper function 实现不同的功能,常用如下:
addUtilities该方法将静态自定义样式注册到 utilities 容器中matchUtilities该方法将动态自定义样式注册到 utilities 容器中addComponents该方法将静态自定义样式注册到 components 容器中matchComponents该方法将动态自定义样式注册到 components 容器中addBase该方法将自定义样式注册到 base 容器中addVariant该方法用于注册自定义状态变量theme该方法可以获取当前 Tailwind 配置中theme选项的信息
该函数接收两个参数:- 第一个参数用以指定需要获取哪个属性值,例如
theme('fontSize.lg')获取值为['1.125rem', { lineHeight: '1.75rem' }] - (可选)第二个参数用以提供默认值,当第一个参数指定要获取的属性值不存在时,返回该默认值
- 第一个参数用以指定需要获取哪个属性值,例如
config该方法可以获取当前 Tailwind 的配置信息corePlugins该方法可以检查特定的核心插件是否启用了e该方法用于对字符串进行转义,让它可合法地作为类名用在 HTML 元素中(该方法一般是在一些可允许使用者自定义基础类名的插件使用的,以确保像.rotate-1/4这样的类能按预期工作)
Tip
通过插件添加的基础类支持于状态变量,如 hover,配合使用
Tip
通过插件添加的基础类只有在 HTML 页面使用了,其相应的样式才会编译到最后的样式表中,保证了项目文件的大小最优化
Tip
可以为插件函数传递(可选)第二个参数,它是一个对象(相当于另一个 Tailwind 配置对象),用以设置插件的 theme 和 variants 选项的默认值
// 插件源码
const plugin = require('tailwindcss/plugin')

module.exports = plugin(function({ addUtilities, e, theme, variants }) {
  // ...
},
// 默认的 `theme` 和 `variants` 选项
{
  theme: {
    gradients: theme => ({
      'blue-green': [theme('colors.blue.500'), theme('colors.green.500')],
      'purple-blue': [theme('colors.purple.500'), theme('colors.blue.500')],
      // ...
    })
  },
  variants: {
    gradients: ['responsive', 'hover'],
  }
})
新增样式到 utilities 容器
在插件中使用 addUtilities 或 matchUtilities helper function 添加基础类,并将样式添加到 utilities 容器。
- 使用
addUtilities方法添加静态的样式构成的基础类tailwind.config.jsjsconst plugin = require('tailwindcss/plugin') module.exports = { plugins: [ plugin(function({ addUtilities }) { addUtilities({ '.content-auto': { 'content-visibility': 'auto', }, '.content-hidden': { 'content-visibility': 'hidden', }, '.content-visible': { 'content-visibility': 'visible', }, }) }) ] } - 使用
matchUtilities方法添加动态的样式(通过函数返回的样式值)构成的基础类。tailwind.config.jsjsconst plugin = require('tailwindcss/plugin') module.exports = { theme: { tabSize: { 1: '1', 2: '2', 4: '4', 8: '8', } }, plugins: [ plugin(function({ matchUtilities, theme }) { matchUtilities( { tab: (value) => ({ tabSize: value }), }, { values: theme('tabSize') } ) }) ] }
通过这种方式构建的自定义基础类,在 HTML 元素上使用时支持使用任意值utility-[value]html<div class="tab-[13]"> <!-- ... --> </div>
Tip
通过插件添加到 utilities 容器的样式,其基础类会考虑 Tailwind 配置中的 prefix 和 important 选项,并进行相应的调整
module.exports = {
  prefix: 'tw-',
  important: true,
  // ...
}
/* 编译结果 */
/* 其中 content- 前缀为原来的基础类 */
.tw-content-auto {
  content-visibility: auto !important;
}
.tw-content-hidden {
  content-visibility: hidden !important;
}
.tw-content-visible {
  content-visibility: visible !important;
}
新增样式到 components 容器
在插件中使用 addComponents helper function 添加基础类,并将样式添加到 components 容器。
Tip
在 components 容器中添加的基础类,它们的样式都更复杂,一般用于设置一些具体的视觉元素的,如按钮、表单等
const plugin = require('tailwindcss/plugin')

module.exports = {
  plugins: [
    plugin(function({ addComponents }) {
      addComponents({
        '.btn': {
          padding: '.5rem 1rem',
          borderRadius: '.25rem',
          fontWeight: '600',
        },
        '.btn-blue': {
          backgroundColor: '#3490dc',
          color: '#fff',
          '&:hover': {
            backgroundColor: '#2779bd'
          },
        },
        '.btn-red': {
          backgroundColor: '#e3342f',
          color: '#fff',
          '&:hover': {
            backgroundColor: '#cc1f1a'
          },
        },
      })
    })
  ]
}
Tip
通过插件添加到 components 容器的样式,其基础类会考虑 Tailwind 配置中的 prefix 选项(但不会考虑 important 选项,避免这些样式具有最高优先级,这样才可以在 HTML 元素使用 utilities 容器中基础类时,所对应的样式覆盖修改在 components 容器中基础类所对应的样式),并进行相应的调整
新增样式到 base 容器
在插件中使用 addBase helper function 添加基础类,并将(重置)样式添加到 base 容器。
const plugin = require('tailwindcss/plugin')

module.exports = {
  plugins: [
    plugin(function({ addBase, theme }) {
      addBase({
        'h1': { fontSize: theme('fontSize.2xl') },
        'h2': { fontSize: theme('fontSize.xl') },
        'h3': { fontSize: theme('fontSize.lg') },
      })
    })
  ]
}
Tip
由于重置样式 reset 一般匹配的是一类元素,例如 div、h1 等,为它们设置预设样式,以便在不同的浏览器中具有相同的初始样式,所以在该容器的基础类并不会考虑 Tailwind 配置中的 prefix 选项
添加状态变量
在插件中使用 addVariant helper function 添加状态变量,它的第一个参数是状态变量的名称,第二个参数是对 CSS 类选择器进行处理/转换的方式,如状态变量 hover,它的处理/转换方式是 &:hover
const plugin = require('tailwindcss/plugin')

module.exports = {
  // ...
  plugins: [
    plugin(function({ addVariant }) {
      addVariant('optional', '&:optional')
      addVariant('hocus', ['&:hover', '&:focus'])
      addVariant('supports-grid', '@supports (display: grid)')
    })
  ]
}
<form class="flex supports-grid:grid ...">
  <input class="optional:border-gray-300 ..." />
  <button class="bg-blue-500 hocus:bg-blue-600">...</button>
</form>
暴露选项
插件可以通过暴露选项,让后使用者在调用插件同时,通过传递相应的参数来配置这些选项,可对插件进行一定程度的自定义,例如设置自定义插件所添加的基础类名。
此时使用 plugin.withOptions 方法,它和原来的 plugin 方法类似,只是它的入参是一个带有 options 用户配置的函数,而该函数返回一个函数,这个函数正是作为原来的 plugin 方法的入参(相当于用了一个带有 options 参数的函数对其进行封装),即可以解构出一些列的 helper function,这样可以同时接收到用户的配置,同时调用 helper function 来添加自定义样式
const plugin = require('tailwindcss/plugin')

module.exports = plugin.withOptions(function (options) {
  return function({ addComponents }) {
    const className = options.className ?? 'markdown'

    addComponents({
      // 允许用于自定义基础类名
      [`.${className}`]: {
        // ...
      }
    })
  }
},
// 设置插件的 theme 和 variants 选项的默认值
// 也是要用带有 `options` 参数的函数对其进行封装
function (options) {
  // 返回的对象用以设置插件的 theme 和 variants 选项的默认值
  return {
    theme: {
      markdown: {
        // ...
      }
    },
  }
})
然后用户在使用插件时,可以传递参数对插件进行配置
module.exports = {
  theme: {
    // ...
  },
  plugins: [
    require('./plugins/markdown.js')({
      className: 'wysiwyg'
    })
  ],
}
官方插件
官方提供了一些插件实现更强大的功能
可以通过 npm 进行安装,然后在 Tailwind 的配置文件的 plugins 选项中进行注册
module.exports = {
  // ...
  plugins: [
    require('@tailwindcss/typography'),
    require('@tailwindcss/forms'),
    require('@tailwindcss/line-clamp'),
    require('@tailwindcss/aspect-ratio'),
  ]
}
@tailwindcss/typography插件注册了一系列以prose为前缀的基础类,可以为页面特定区域的内容添加好看的样式,这些内容一般不在原网页上,而是从远端服务器获取的,如 CMS 或 Markdown 文件转换而成的。html<!-- 「容器」 article 元素需要添加 prose 类名 --> <article class="prose lg:prose-xl"> {{ markdown }} </article>
将这些基础类添加到将要加载显式文本内容的「容器」元素上,然后从服务器获取的文本就可以在网页上渲染出好看的样式。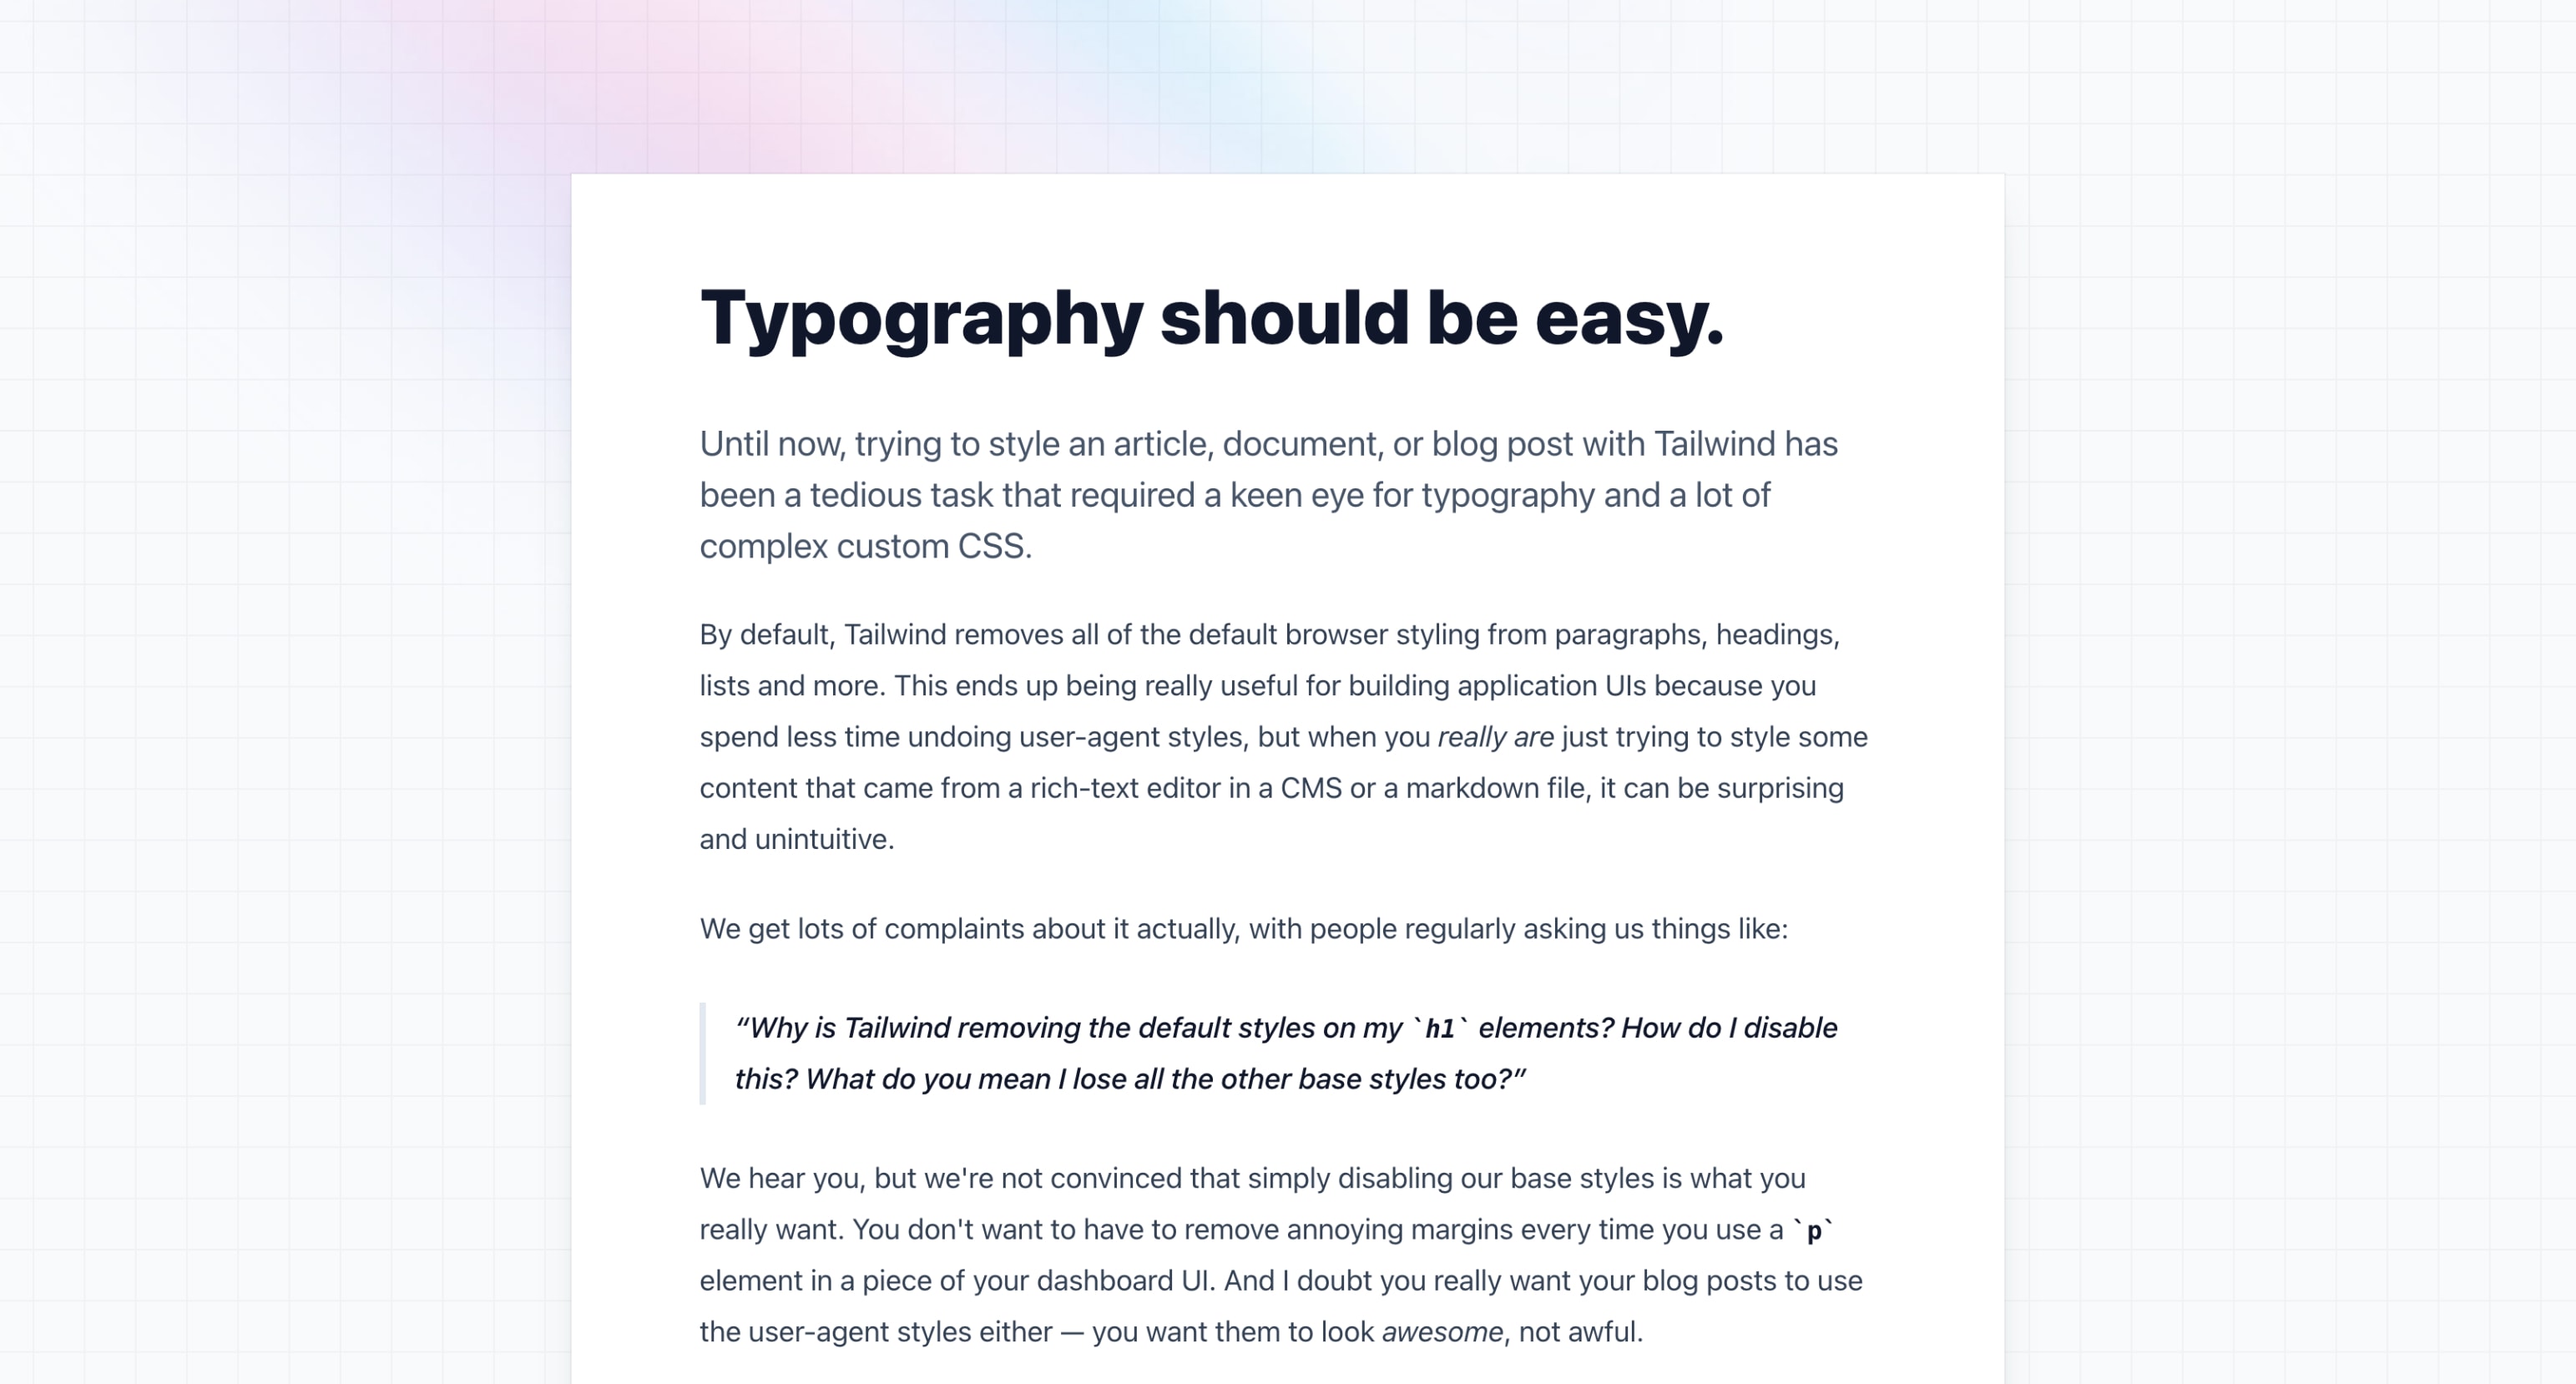
tailwind-plugin-typography
而且该插件还提供了一系列针对不同元素的状态变量,可以用于对「容器」内特定的元素设置样式。如果需要和其他状态变量「叠加」使用,其他状态变量应该在前面,而prose-为前缀的状态变量在最后。html<article class="prose prose-img:rounded-xl prose-headings:underline prose-a:text-blue-600 hover:prose-a:text-blue-500"> {{ markdown }} </article>html<article class="prose max-w-none"> {{ markdown }} </article>Tip
如果加载的内容(某些元素)自带了样式,不希望应用该插件预设的样式,可以为这些元素添加
not-prose类名html<article class="prose"> <h1>My Heading</h1> <p>...</p> <div class="not-prose"> <!-- Some example or demo that needs to be prose-free --> </div> <p>...</p> <!-- ... --> </article>@tailwindcss/forms插件 提供了多种表单初始化样式,让表单元素更易于使用 Tailwind 进行样式定制。@tailwindcss/line-clamp插件 注册了line-clamp-{lines}基础类,以增强段落截短的功能,按照行数lines来对段落文本进行截短,具体效果可以查看该 视频教程@tailwindcss/aspect-ratio插件 用以控制元素的宽高比例。💡 在 Tailwind v3 版本中,已经提供了控制元素宽高比例的基础类,可以不依赖于插件直接使用。
presets
presets 选项用以指定自定义的预设配置 preflight,可以包含 theme、prefix、plugins 等选项,它会与 Tailwind 默认配置进行合并,并覆盖有冲突的配置,这对于协同开发不同项目时,统一初始样式很有作用。
// Example preset
module.exports = {
  theme: {
    colors: {
      blue: {
        light: '#85d7ff',
        DEFAULT: '#1fb6ff',
        dark: '#009eeb',
      },
      pink: {
        light: '#ff7ce5',
        DEFAULT: '#ff49db',
        dark: '#ff16d1',
      },
      gray: {
        darkest: '#1f2d3d',
        dark: '#3c4858',
        DEFAULT: '#c0ccda',
        light: '#e0e6ed',
        lightest: '#f9fafc',
      }
    },
    fontFamily: {
      sans: ['Graphik', 'sans-serif'],
    },
    extend: {
      flexGrow: {
        2: '2',
        3: '3',
      },
      zIndex: {
        60: '60',
        70: '70',
        80: '80',
        90: '90',
        100: '100',
      },
    }
  },
  plugins: [
    require('@tailwindcss/typography'),
    require('@tailwindcss/aspect-ratio'),
  ],
}
module.exports = {
  // the preset to re-use
  presets: [
    require('./my-preset.js')
  ],
  // Customizations specific to this project would go here
  theme: {
    extend: {
      minHeight: {
        48: '12rem',
      }
    }
  },
  variants: {
    extend: {
      backgroundColor: ['active']
    },
  },
}
Tip
preset 选项是一个数组,可以同时为项目添加多个自定义的预设配置,此时它们的添加次序很重要,因为后添加的预设配置会覆盖掉前面添加的冲突的预设配置。
Tip
如果希望 preset 完全覆盖 Tailwind 的默认配置(而不是将自定义预设与默认配置进行合并),可以将其自身的 preset 选项设置为空数组 []
module.exports = {
  presets: [],
  theme: {
    // ...
  },
  plugins: [
    // ...
  ],
  // ...
}
module.exports = {
  presets: [
    require('./example-preset.js')
  ],
  // ...
}
而如果只是想完全禁止使用 Tailwind 的默认配置,则类似地将 preset 设置为空数组 [] 即可,此时项目就没有预设的开箱即用的颜色、字体、间距等基础类供选择了。
module.exports = {
  presets: [],
  // ...
}
prefix
prefix 选项指定一个字符串作为前缀,然后在 HTML 元素中使用基础类时可以添加上这个前缀,避免与项目的其他类名发生冲突。然后编译器扫描文档时会识别带有这些前缀的类名,生成相应的样式
module.exports = {
  // ...
  prefix: 'tw-',
}
Tip
这些前缀不要添加到状态变量上
<div class="tw-text-lg md:tw-text-xl tw-bg-red-500 hover:tw-bg-blue-500">
  <!-- -->
</div>
然后编译的样式表中,所有 Tailwind 生成的类名都包含前缀 tw-
.tw-text-left {
  text-align: left;
}
.tw-text-center {
  text-align: center;
}
.tw-text-right {
  text-align: right;
}
/* etc. */
Tip
自定义的基础类编译时不会加上该前缀
@tailwind base;
@tailwind components;
@tailwind utilities;

@layer utilities {
  .bg-brand-gradient { /* ... */ }
}
/* 编译结果 */
.bg-brand-gradient { /* ... */ }
.hover\:bg-brand-gradient:hover { /* ... */ }
如果希望自定义基础类编译后也带有相应的前缀,以便自定义的基础类在 HTML 元素上使用体验一样,可以在定义这些自定义基础类时就带有前缀
@tailwind base;
@tailwind components;
@tailwind utilities;

@layer utilities {
  .tw-bg-brand-gradient { /* ... */ }
}
important
important 选项可以控制是否给由 Tailwind 基础类所编译生成的样式添加 !important 声明,以获得最高的优先级
module.exports = {
  // ...
  important: true,
}
/* 编译结果 */
.leading-none {
  line-height: 1 !important;
}
.leading-tight {
  line-height: 1.25 !important;
}
.leading-snug {
  line-height: 1.375 !important;
}
/* etc. */
Tip
但是自定义基础类并不会受此选项的影响,如果希望自定义的基础类也有 !important 声明,应该在声明时就添加该声明
@tailwind base;
@tailwind components;
@tailwind utilities;

@layer utilities {
  .bg-brand-gradient {
    background-image: linear-gradient(#3490dc, #6574cd) !important;
  }
}
Warning
important 选项直接设置为 true 则 Tailwind 基础类所编译得到的样式会具有最高优先级,这会覆盖 HTML 元素的行内样式(很多第三方 JS 库会使用行内样式给页面添加特定的样式)。为了避免这种冲突,该选项的值可以使用表示 CSS ID 选择器的字符串,然后在网页的根元素或 <body> 元素上添加该 ID 名,这样 Tailwind 的基础类所编译得到的样式具有较高的优先级(可以覆盖其他使用类名指定的样式),但是同时保留了行内样式更高的优先级。
module.exports = {
  // ...
  important: '#app',
}
<html>
<!-- ... -->
<style>
  .high-specificity .nested .selector {
    color: blue;
  }
</style>
<!-- 需要在根节点添加 id 为 app -->
<body id="app">
  <div class="high-specificity">
    <div class="nested">
      <!-- 样式为 red-500 而不是 selector 类所指定的样式-->
      <div class="selector text-red-500"><!-- ... --></div>
    </div>
  </div>

  <!-- 样式是 #bada55 行内样式优先级更高-->
  <div class="text-red-500" style="color: #bada55;"><!-- ... --></div>
</body>
</html>
separator
separator 选项用以定制状态变量与基础类组合时所使用的连接符,默认使用冒号 :
因为如果你在项目中使用一些模板语法,例如 pug(而不是 HTML),有些字符是不支持作为类名的,则需要对连接符进行定制
module.exports = {
  separator: '_',
}
corePlugins
corePlugins 选项用以控制 Tailwind 可以对哪些基础类进行编译。
Tip
可以在官方文档中查看有哪些核心插件。
- 如果希望禁止对某些基础类进行编译为相应的样式,可以将其核心插件设置为
falsetailwind.config.jsjsmodule.exports = { // ... corePlugins: { float: false, objectFit: false, objectPosition: false, } } - 相对地,可以用数组的方式列出 「安全」 的基础类,Tailwind 会对这些基础类进行编译tailwind.config.jsjs
module.exports = { // ... corePlugins: [ 'margin', 'padding', 'backgroundColor', // ... ] } - 如果想禁止所有基础类的编译(而仅使用自定义的插件),可以将该选项值设置为空数组tailwind.config.jsjs
module.exports = {
// ...
corePlugins: []
}
访问配置文件
可以使用 resolveConfig() 方法访问到 Tailwind 的配置文档,以获取 Tailwind 的相关的信息,例如可以获取到配置文档中 theme 属性下的一些预设值
import resolveConfig from 'tailwindcss/resolveConfig'
import tailwindConfig from './tailwind.config.js'

// 通过方法 resolveConfig() 返回一个包含 Tailwind 配置信息的对象
const fullConfig = resolveConfig(tailwindConfig)

// 读取其中属性 theme 的一些预设值
fullConfig.theme.width[4]
// => '1rem'

fullConfig.theme.screens.md
// => '768px'

fullConfig.theme.boxShadow['2xl']
// => '0 25px 50px -12px rgba(0, 0, 0, 0.25)'